Did you know that nearly 30% of what we throw away in our daily trash could actually be used to grow a lush garden? It’s a staggering statistic, but it represents a massive opportunity for anyone looking to live more sustainably. If you’ve ever felt a pang of guilt tossing coffee grounds or wilted lettuce into the garbage, you are already halfway to becoming a composter.
Composting is the natural process of recycling organic matter like leaves and food scraps into a valuable fertilizer that can enrich soil and plants. Often referred to by gardeners as “Black Gold,” finished compost is a nutrient-dense, crumbly substance that restores life to tired dirt, helps soil retain water, and reduces the need for chemical fertilizers.
But composting is about more than just your backyard; it’s a powerful tool in the fight against climate change. When organic waste is trapped in a landfill, it decomposes without oxygen, producing methane a greenhouse gas significantly more potent than carbon dioxide. By composting at home, you aren’t just making soil, you are actively cooling the planet.
It’s time to stop seeing waste as a “problem” and start seeing it as a resource. Let’s dive into how to start composting today.

Composting.
Before we get into the “how,” let’s briefly touch on the “why.” Composting isn’t just a trend; it’s a powerful practice with numerous benefits:
- Waste Reduction: A significant portion of household waste, often up to 30%, is organic material that can be composted. By diverting this from landfills, you reduce methane gas emissions, a potent greenhouse gas.
- Soil Enrichment: Compost is often called “black gold” for a reason. It’s a natural fertilizer that improves soil structure, aeration, and water retention. It also introduces beneficial microorganisms, helping plants thrive without chemical fertilizers.
- Environmental Benefits: Less landfill waste means less pollution. Healthier soil leads to stronger plants, which are better at sequestering carbon and supporting local ecosystems.
- Cost Savings: Why buy expensive soil amendments and fertilizers when you can create your own for free?
Understanding the Composting Process.
Composting is essentially controlled decomposition. It’s the natural process where microorganisms break down organic matter into a nutrient-rich soil-like substance. To do this effectively, these tiny workers need four key ingredients:
- Greens (Nitrogen-Rich): These are materials high in nitrogen, which provides the protein for the microorganisms. Examples include food scraps, fresh grass clippings, and coffee grounds.
- Browns (Carbon-Rich): These materials are high in carbon and provide energy for the microorganisms. Examples include dry leaves, shredded cardboard, wood chips, and straw.
- Water (Moisture): Just like us, microorganisms need water to survive and function. The compost pile should be consistently damp, like a wrung-out sponge.
- Air (Oxygen): Most effective composting relies on aerobic bacteria, which need oxygen. Turning your compost pile introduces air and prevents it from becoming a stinky, anaerobic mess.
The ideal ratio is roughly 2-3 parts browns to 1 part greens. Don’t get too hung up on exact measurements, but keep this balance in mind as you add materials.

Choosing Your Composting Method.
There are several ways to compost, each with its own advantages. Your choice will depend on your space, how much waste you produce, and your desired effort level.
1. Cold Composting (Passive Composting)
This is the simplest method, requiring minimal effort. You simply pile up your organic waste and let nature take its course.
- Pros: Easy, low maintenance, requires no special equipment.
- Cons: Slower process (can take a year or more), doesn’t get hot enough to kill weed seeds or pathogens.
- Best For: Those with ample space, low waste volume, and high patience.
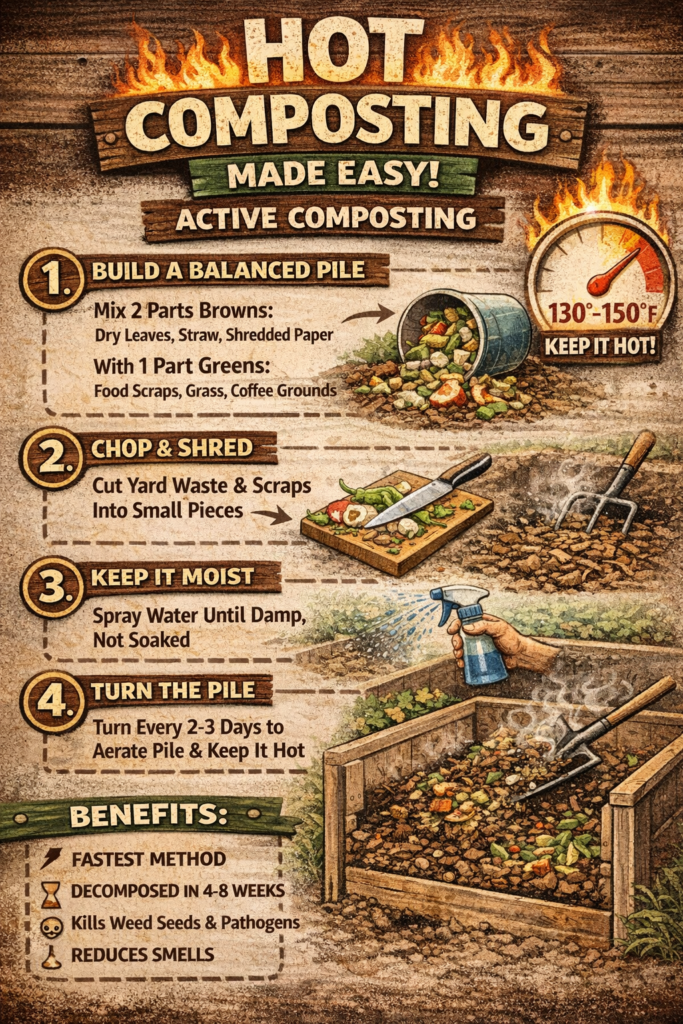
2. Hot Composting (Active Composting)
Hot composting aims to create an ideal environment for microorganisms to break down materials quickly. The pile heats up, accelerating decomposition and killing most weed seeds and pathogens.
- Pros: Fast (can produce compost in a few weeks to months), kills weed seeds and pathogens, efficient.
- Cons: Requires more attention (turning, monitoring moisture and temperature), needs a good balance of greens and browns.
- Best For: Gardeners who want compost quickly, have a moderate to large amount of waste, and are willing to put in a bit more effort.
3. Vermicomposting (Composting with Worms)
This method uses special composting worms (red wigglers) to break down food scraps into nutrient-rich “worm castings.”
- Pros: Excellent for food scraps, can be done indoors or in small spaces, produces extremely rich compost.
- Cons: Requires specific worms, can be sensitive to extreme temperatures or certain food types, may not handle large volumes of yard waste.
- Best For: Apartment dwellers, those with limited outdoor space, or anyone primarily looking to compost food scraps.
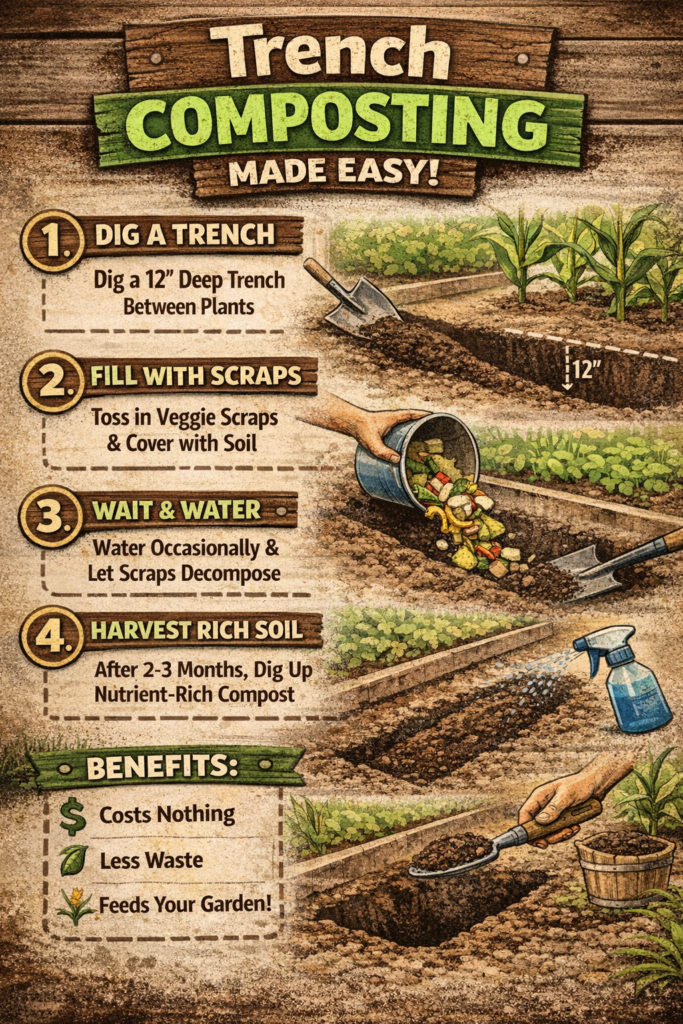
4. Trench Composting
Involves burying food scraps directly into your garden beds.
- Pros: Very discreet, directly enriches the soil where plants will grow, no need for a visible pile or bin.
- Cons: Slower decomposition, can attract pests if not buried deep enough, can’t handle large volumes.
- Best For: Small gardens, individual beds, and those who prefer a “set it and forget it” approach for food waste.
5. Bokashi Composting
A unique anaerobic fermentation process that “pickles” food waste using a special inoculated bran.
- Pros: Can handle meat, dairy, and oily foods (which traditional composting often avoids), reduces odors, quick initial processing.
- Cons: Requires a special air-tight bucket and Bokashi bran, the fermented material still needs to be buried or added to a traditional compost pile for full decomposition.
- Best For: Those who want to compost all food scraps, including problematic ones, and are comfortable with a two-step process.
Setting Up Your Composting System: Step-by-Step
Let’s assume you’ve chosen a method (hot composting is a popular and effective choice for many). Here’s how to get started:
1. Choose a Location
Select a spot that is:
- Convenient: Easy to access from your kitchen and garden.
- Shady: To prevent the pile from drying out too quickly in the sun.
- Well-drained: To avoid waterlogging.
- Away from structures: To prevent potential moisture damage or pest attraction.
- On bare soil: This allows beneficial organisms from the ground to enter the pile and excess moisture to drain.
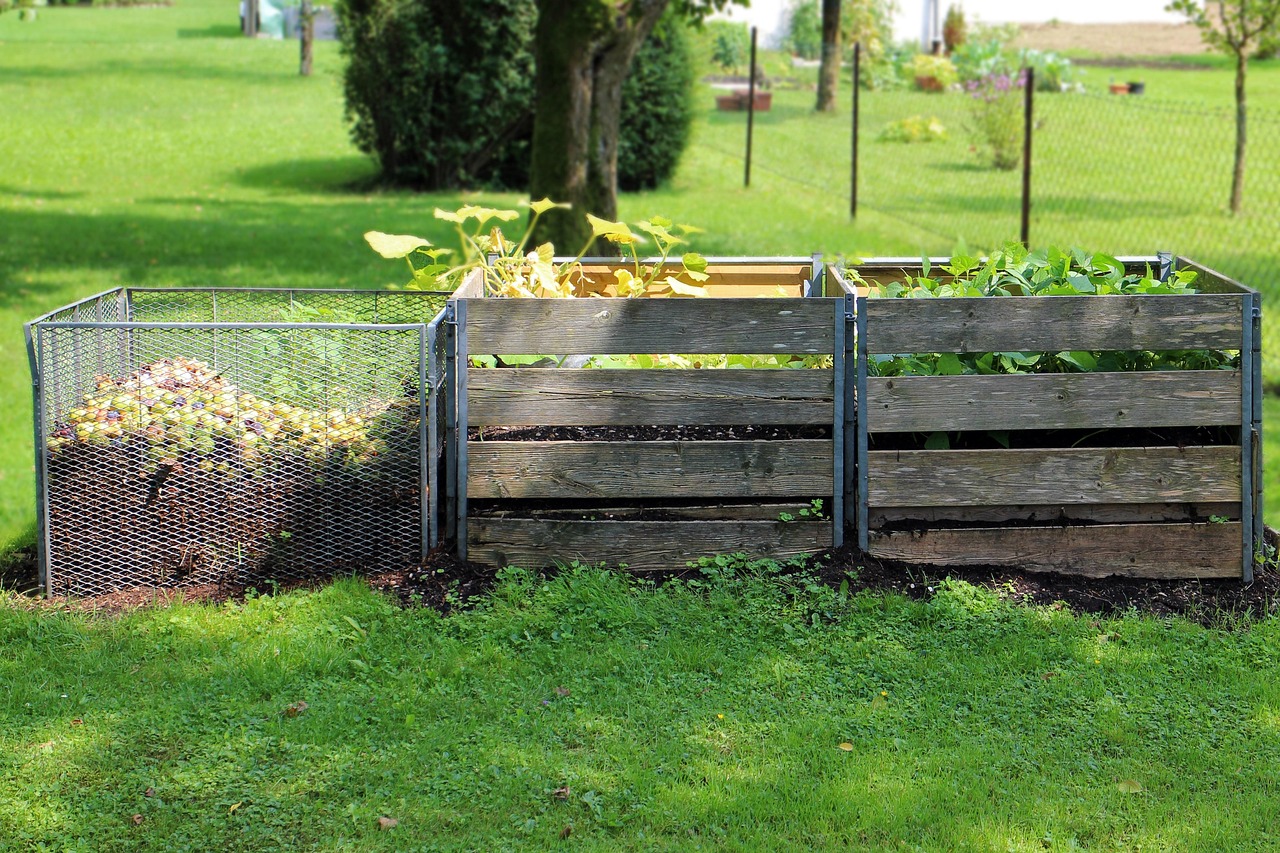
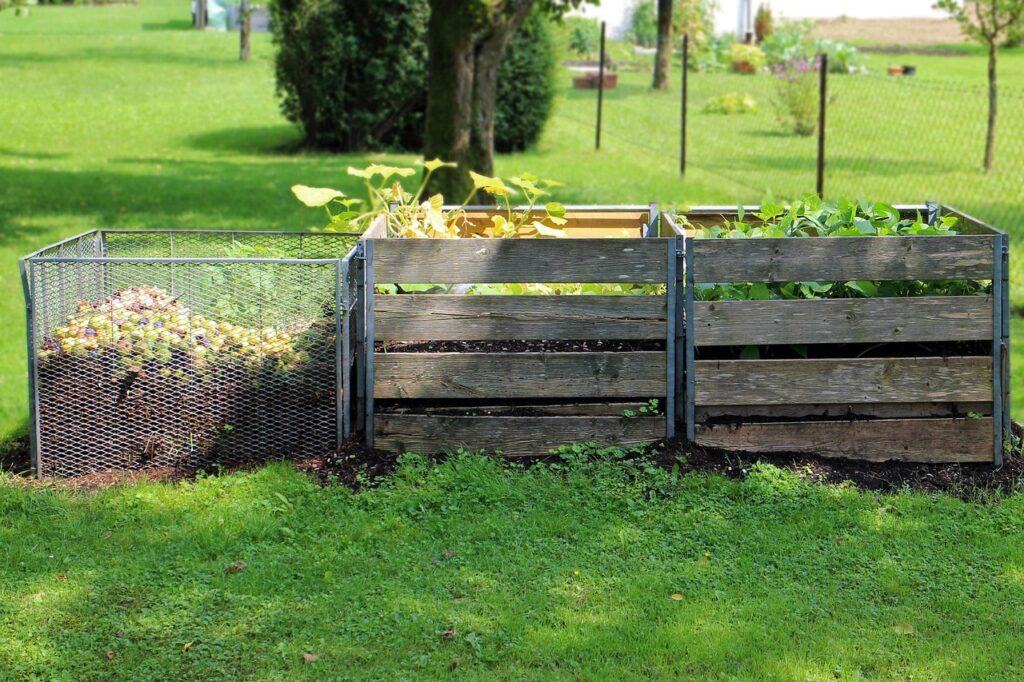
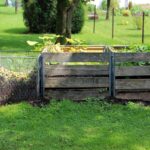
2. Select Your Composting Container (Optional but Recommended)
While you can just make a pile, a bin helps contain it and speed up the process. Options include:
- DIY Bins: Pallets, wire mesh, concrete blocks – cost-effective and customizable.
- Compost Tumblers: Enclosed rotating bins that make turning easy. Great for smaller spaces and keeping pests out.
- Plastic Bins: Often readily available, with lids and aeration holes.
3. Gather Your Materials
Start collecting your “greens” and “browns.”
Greens (Nitrogen):
- Vegetable and fruit scraps
- Coffee grounds and filters
- Tea bags
- Fresh grass clippings
- Garden trimmings (soft, green parts)
- Manure (from herbivores like horses, chickens, rabbits)
- Eggshells (crushed)
Browns (Carbon):
- Dry leaves
- Shredded newspaper and cardboard (non-glossy, remove tape)
- Straw or hay
- Wood chips or sawdust (in moderation)
- Twigs (small, broken pieces)
- Pine needles
Avoid these in your compost pile (especially hot composting):
- Meat, bones, fish scraps (attract pests, can smell, slow to break down)
- Dairy products (attract pests, smell)
- Oils and greasy foods (attract pests)
- Diseased plants (can spread disease)
- Weeds with seeds (can spread weeds)
- Pet waste (from carnivores like dogs/cats – can contain harmful pathogens)
- Chemically treated wood or plants
- Glossy paper or colored inks
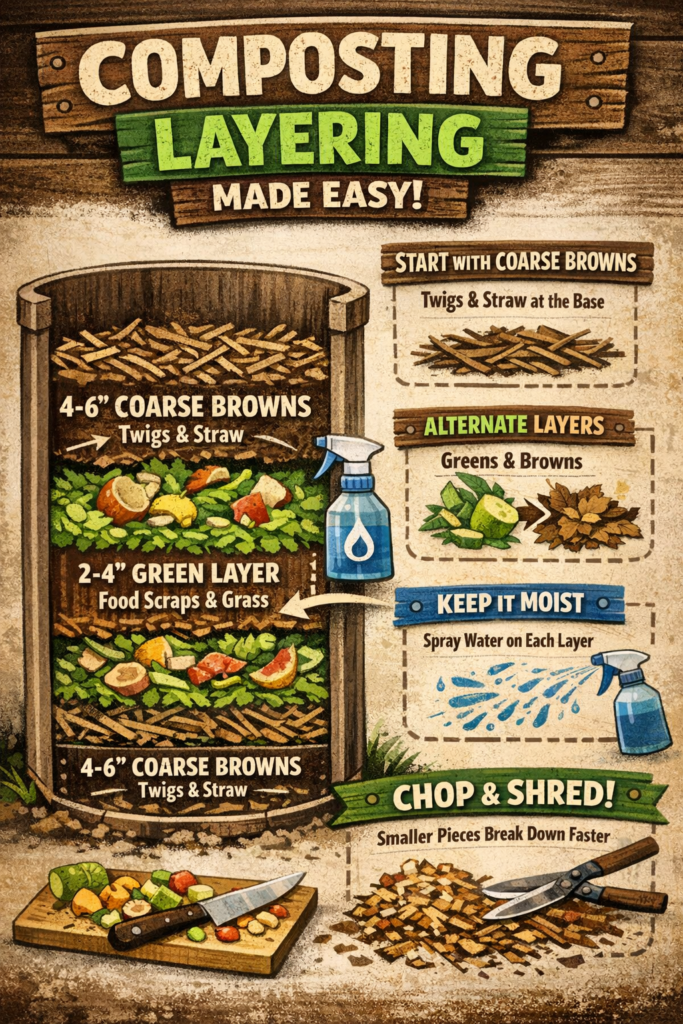
4. Build Your Pile (Layering Method)
Think of it like building a lasagna!
- Start with a base of browns: A 4-6 inch layer of coarse browns (twigs, straw) at the bottom helps with aeration and drainage.
- Alternate layers: Add a layer of greens (2-4 inches), then a layer of browns (4-6 inches).
- Moisten each layer: As you add materials, spray them with water until they are damp.
- Chop materials: Smaller pieces break down faster, so chop up food scraps and shred leaves.
5. The Composting Process.
- Moisture: Keep the pile consistently moist, like a wrung-out sponge. If it’s too dry, decomposition slows. If it’s too wet, it becomes anaerobic and smelly.
- Turning (Aeration): For hot composting, turn your pile regularly – every few days to once a week. This introduces oxygen, mixes materials, and helps distribute heat and moisture. Use a pitchfork or compost aerator.
- Temperature: A hot compost pile will heat up to 130-160°F (55-70°C). You can use a compost thermometer to monitor this. When the temperature drops, it’s a sign that the pile needs turning or more “greens.”
- Adding new materials: Continue adding greens and browns as you generate them. Try to maintain the 2-3:1 brown-to-green ratio.
- Patience: Even with hot composting, it takes time. You’ll know it’s ready when it’s dark brown, crumbly, smells earthy, and you can no longer identify the original materials.
Also read: Septic Tank Pumping Salary 2026
Troubleshooting Common Composting Problems
Don’t worry if you encounter a few bumps along the way. Composting is a learning process!
- Smelly Pile:
- Cause: Too much nitrogen (greens), too much moisture, not enough air (needs turning).
- Solution: Add more browns (dry leaves, shredded paper), turn the pile, ensure it’s not waterlogged.
- Dry Pile/Slow Decomposition:
- Cause: Not enough moisture, not enough nitrogen (greens).
- Solution: Water the pile, add more greens (food scraps, grass clippings).
- Attracting Pests (Rodents, Flies):
- Cause: Exposed food scraps, meat/dairy/oils in the pile, pile not hot enough.
- Solution: Always bury food scraps deep within the pile, cover them with browns, avoid prohibited items, ensure your bin is pest-proof.
- Pile Not Heating Up:
- Cause: Not enough nitrogen (greens), not enough moisture, pile too small, not enough aeration.
- Solution: Add more greens, moisten the pile, consider building a larger pile or turning more frequently.
Using Your Finished Compost
Once your compost is ready, it’s time to enjoy the fruits of your labor!
- Garden Beds: Dig it into your garden beds before planting to improve soil structure and fertility.
- Top Dressing: Spread a layer of compost around existing plants as a slow-release fertilizer and mulch.
- Potting Mix: Mix it with soil, perlite, or vermiculite to create a nutrient-rich potting mix for containers.
- Seed Starting: A finely sifted compost can be excellent for seed starting mixes.
- Lawns: Broadcast compost over your lawn to improve soil health and grass vigor.
The Impact of Composting.
| Category | Percentage of Landfill Waste (Avg.) | Potential Diverted by Composting |
| Organic Materials | ~30% | 100% |
| Food Scraps | ~15% | 100% |
| Yard Trimmings | ~15% | 100% |
| Paper & Paperboard | ~23% | Some (shredded, non-glossy) |
| Plastics | ~12% | 0% |
| Metals | ~9% | 0% |
| Glass | ~5% | 0% |
| Other | ~21% | Varies |
Source: EPA data, approximate figures for illustrative purposes.
This chart highlights that by composting, you can eliminate a significant portion of your household waste destined for landfills, directly contributing to a healthier planet.
Composting for a Sustainable Future
Composting is more than just managing waste; it’s an act of stewardship for the environment. By transforming your organic discards into valuable soil amendment, you’re closing the loop, nurturing your garden, and reducing your ecological footprint. It’s a simple yet profound way to connect with the natural cycles of life and contribute to a more sustainable future. Start today, and watch your garden (and your conscience) flourish!


[…] Also read: How to start composting in 2026. […]
[…] Also read: How to start composting. […]
[…] is nothing quite like the “black gold” of a healthy compost pile to make a gardener feel accomplished. But when you step into your […]
[…] for a gardener, coffee grounds aren’t waste they are “black gold.” Rich in nitrogen, slightly acidic, and loved by earthworms, coffee grounds are one of the […]